WIFI Settings

To optimize your wireless network’s performance and speed, consider the following organized approach:

  1. Channel Selection:
    • Use channels 1, 6, or 11 for better signal quality and reduced interference.
    • Utilize tools like InSSIDer to identify less busy channels in your area.
  2. Encryption Settings:
    • Enable WPA3 encryption if supported by your devices for the strongest security and performance.
    • Avoid outdated standards like WEP and WPA unless necessary.
  3. Dual-Band Routers:
    • Use dual-band routers to connect older devices (2.4GHz) and newer gadgets (5GHz) separately, maximizing speed.
  4. Minimize Interference:
    • Reduce interference from devices like Bluetooth or competing Wi-Fi networks.
    • Ensure good signal quality by using external antennas if possible.
  5. Network Management:
    • Check your router’s current settings to ensure they are set optimally.
    • Consider manual channel selection if auto-settings aren’t sufficient.

By following these steps, you can enhance your wireless network’s performance and enjoy a smoother online experience.

Upgrade, Repair, or Replace?

When your tech breaks, you’re faced with a tough question: should I fix it, upgrade it, or just get a new one? Let’s break it down.

The 50% Rule

The 50% rule says if repairing costs more than half the price of a new device, it’s better to replace. Think about your phone—repairing might cost $200, but a new one could be $400. So, repair or replace? If repair is over 50%, choose replace.

When to Repair

  • If you love your device and it’s not broken too bad.
  • If fixing it yourself or by a pro doesn’t break the bank.
  • If it’s under two years old and worth the investment.

When to Upgrade

  • If you want better features like a bigger screen or faster speed.
  • If upgrading parts (like RAM or storage) makes sense but costs too much to fix.
  • If the device is getting old and might break more often.

Replace When

  • It’s over two years old and repair costs are high.
  • You can’t find good replacement parts.
  • You don’t want to deal with the hassle of fixing it yourself.

Choosing Third-Party Parts

  • Look for savings on things like chargers and batteries.
  • Check reviews carefully before buying.
  • Universal items might work across devices, saving money.

By following this guide, you can decide whether to fix your tech or get a new one, saving time and money in the long run!

Understanding Camcorders

Understanding Camcorders


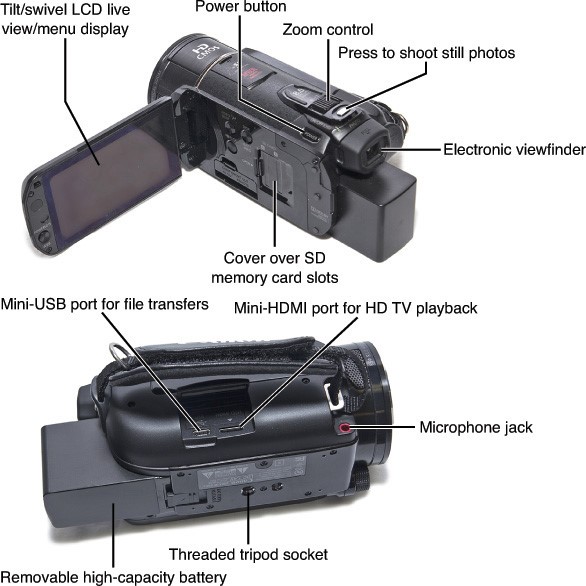
Camcorders are like small video cameras that you can carry around. They don’t use old tape anymore; instead, they use built-in or added memory like a flash drive to store videos.

Control Buttons
Menu Button: Lets you change settings for what you’re shooting.
Playback Button: Lets you watch the videos you’ve taken on the screen.
Shutter Button: Starts and stops recording video.
Zoom Buttons: Let you look at your subject bigger or smaller.
Delete Button: Lets you get rid of videos you don’t want anymore.

External Features
LCD Screen: A small screen where you can see what you’re shooting and what you’ve already recorded.
Battery: Most camcorders use their own rechargeable batteries, like how a smartphone works. Some can also use regular AA batteries if you prefer.
Connections: Camcorders connect to TVs or computers using HDMI cables for better picture quality on HD TVs or USB cables to transfer videos to your computer.

Adding More Features
Some camcorders have special places where you can attach microphones to record better sound. You might see these called “hot shoes.”
You can also use lights or other gadgets to make your videos look better, depending on the camcorder you choose.

Keeping Your Camcorder Healthy
Don’t let it get dirty or scratchy. Clean the screen and lens gently.
Be careful not to drop it too much, as that can break the camera or the lens.
Don’t leave batteries in the camcorder for a long time, as they might leak or make the camera bad.

By treating your camcorder well and keeping it clean, you can take great videos and share them with your friends

Digital Cameras

Digital cameras are like tiny computers with built-in lenses that capture images and store them digitally. They come in various shapes and sizes, from compact point-and-shoot models to larger SLR (Single-Lens Reflex) cameras.

Control Buttons and Switches

  • Menu Button: Used to access settings for the current mode.
  • Playback Button: Lets you view photos or videos on the LCD screen or transfer files via USB.
  • Shutter Button: Takes photos or starts video recording.
  • Zoom Buttons: Let you zoom in or out to get a wider or closer view of your subject.
  • Delete Button: Allows you to delete unwanted photos or videos.
  • Shooting Mode Selector: Switches between photo and video modes.

External Features

  • LCD Display: Used for menus and viewing images. Some have swiveling screens for better angle shooting.
  • USB Port: Connects the camera to a computer for transferring files.
  • AV Port: For connecting external devices like speakers or monitors.
  • Microphone Port: Records audio when shooting video, with some supporting add-on microphones.

Interchangeable Components

  • Lenses: Can be swapped for different zoom levels or prime lenses.
  • Hot Shoe: Attaches to cameras designed for external flashes, enhancing lighting capabilities.
  • Microphones: Improve audio quality during video recording.

Internal Components

  • Image Sensor: Determines image quality and low-light performance. Larger sensors (like in full-frame SLRs) generally perform better.
  • Memory Cards: Most use Secure Digital (SD) cards for storage.
  • Mirror System: Reflects light through the lens to the viewfinder, a key part of the camera’s focusing system.

Points of Failure

  • Lens Cleaning: Keep lenses clean to avoid scratching and poor image quality.
  • Impact Damage: Can misalign lenses; repair needed.
  • Water Exposure: Prevent use in wet conditions unless the camera is waterproof.
  • Battery Storage: Avoid storing batteries in unused cameras to prevent leakage or corrosion.

By understanding these features, you can better care for your digital camera and ensure it works smoothly for years to come.

Understanding HDTVs, Projectors, and Monitors

HDTVs (High-Definition Televisions), projectors, and monitors are all devices that display visual content with high resolution. Each has its own unique features and how they function internally.

HDTV Basics:

  • Resolution: HDTVs display images at 720p or higher.
  • Display Technologies: They use Liquid Crystal Display (LCD) or Digital Light Processing (DLP) technologies.
  • Ports: They have HDMI, VGA, and sometimes Component, S-Video, or Composite ports for video input. Audio is often handled through HDMI or RCA ports.

Projector Features:

  • Resolution Support: Most support resolutions up to 1080p or even higher with 4K.
  • Port Options: Typically include HDMI, VGA, USB for both video and data inputs.
  • Control Functions: Allow users to adjust settings like focus, zoom, and keystoning.

Monitor Differences:

  • Types: Monitors use LCD technology and are designed for desk use.
  • Ports: Usually have HDMI or DVI for video input and RCA or HDMI for audio.

Common Components Across Devices:

  • Backlight Assembly: Often uses fluorescent technology and can be a point of failure.
  • Mounting Options: Most can be wall-mounted using VESA mounts.
  • Battery Issues: Projectors and some monitors aren’t designed for battery replacement, so service is needed if the battery dies.

Maintaining Your Devices:

  • Keep cables secure to prevent damage.
  • Turn off unnecessary features like Bluetooth when not in use.
  • Avoid exposing devices to extreme temperatures or moisture.

By understanding these basics, you can better maintain and troubleshoot your HDTV, projector, and monitor, ensuring they work smoothly for years to come. </think>

Understanding HDTVs, Projectors, and Monitors

HDTVs (High-Definition Televisions), projectors, and monitors are all devices that display visual content with high resolution. Each has its own unique features and how they function internally.

HDTV Basics:

  • Resolution: HDTVs display images at 720p or higher.
  • Display Technologies: They use Liquid Crystal Display (LCD) or Digital Light Processing (DLP) technologies.
  • Ports:
    • Video ports: HDMI, VGA, and sometimes Component, S-Video, or Composite.
    • Audio ports: Often through HDMI or RCA.

Projector Features:

  • Resolution Support: Most support resolutions up to 1080p or higher with 4K.
  • Port Options: Typically include HDMI, VGA, and USB for both video and data inputs.
  • Control Functions: Allow users to adjust settings like focus, zoom, and keystoning.

Monitor Differences:

  • Types: Monitors use LCD technology and are designed for desk use.
  • Ports:
    • Video ports: HDMI or DVI.
    • Audio ports: RCA or HDMI.

Common Components Across Devices:

  • Backlight Assembly: Often uses fluorescent technology and can be a point of failure.
  • Mounting Options: Most can be wall-mounted using VESA mounts.
  • Battery Issues: Projectors and some monitors aren’t designed for battery replacement, so service is needed if the battery dies.

Maintaining Your Devices:

  • Keep cables secure to prevent damage.
  • Turn off unnecessary features like Bluetooth when not in use.
  • Avoid exposing devices to extreme temperatures or moisture.

By understanding these basics, you can better maintain and troubleshoot your HDTV, projector, and monitor, ensuring they work smoothly for years to come.

iOS Devices

iOS Device


iOS devices, like iPhones and iPads, are similar in many ways but also have some key differences from Android devices. Let’s take a closer look.


External Features:
Ports: Most new iOS devices use a Lightning port for charging and data transfer.
Cameras: Both front and rear cameras are available, with the rear camera having higher megapixel counts.
Touchscreens: All have high-definition (HD) screens that you can rotate to view in landscape or portrait mode.

Internal Components:
Battery: iOS devices usually have built-in batteries that aren’t meant to be replaced by users. If your battery dies, you’ll need to get it fixed at an Apple store or through a service center.

Keeping Your Device Safe:

iOS devices are generally durable, but they can still break if dropped or mishandled. To protect them:

Use a case or sleeve when not in use to prevent scratches or cracks.
Be careful with charging cables and avoid bending or overheating them.

Charging and Maintenance:

Always use the correct charger and cable to avoid damage.
Turn off unnecessary features, like Bluetooth, when you’re not using them.
If near a Wi-Fi connection, leave it on; otherwise, turn it off to save battery life.

If your device’s battery dies and you can’t charge it immediately, it might stop working until you do. So, keep spares of charging cables and chargers at home for easy access when needed..

Understanding Android Tablets and Smartphones

Understanding Android Tablets and Smartphones


Android devices, like tablets and smartphones, are like tiny computers. They have buttons or ports where you can plug in things like headphones or a USB drive. Some devices even have a way to connect to external speakers.

Inside these devices, there are special computer chips (called processors) that help everything run smoothly. These chips work with the storage, which is where apps and files are kept. The storage capacities usually range from 16GB to 64GB.

Keeping Your Device Safe

Android tablets and smartphones are built to be tough, but they can still get broken if dropped or mishandled. To keep them safe, consider using a case or being extra careful when handling them.

Charging and Maintenance

Chargers and cables can sometimes break, so having extras on hand is a good idea. Also, avoid draining the battery too much by turning off features you don’t need, like Bluetooth if you aren’t using it. When near Wi-Fi, keeping it on is fine, but remember to turn it off when you’re not at home.

If your device’s battery dies and you’re nowhere near a charger, most Android devices can be easily opened for a fresh battery replacement, making them convenient for staying connected.

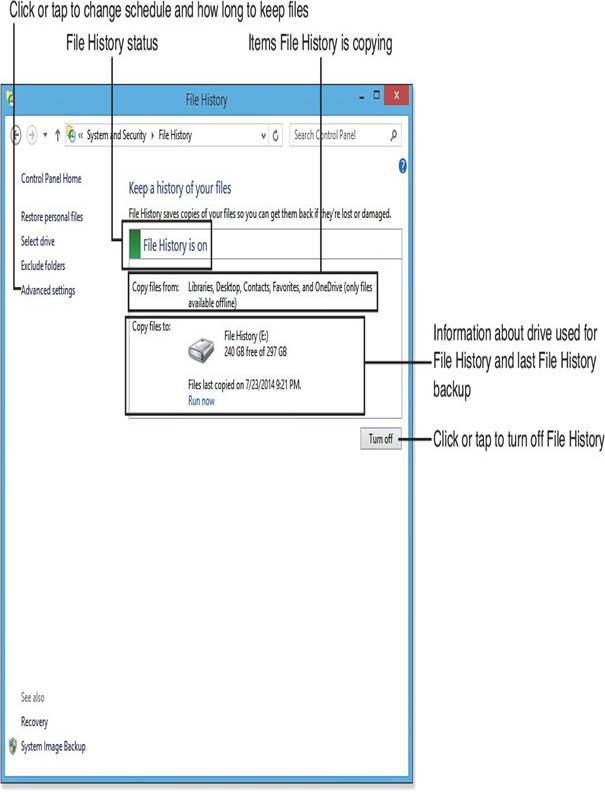
Setting Up File History on Windows 8/8.1: A Step-by-Step Guide

Introduction: File History is a feature in Windows 8/8.1 designed to simplify file backup and restoration processes, making it easier for users to manage their data securely. This guide provides a straightforward approach to setting up File History, tailored for junior high and high school students.

Materials Needed:

  • External hard disk (with sufficient storage capacity)
  • Access to a Windows 8/8.1 computer
  • Internet connection (for optional updates and information)

Step-by-Step Instructions:

  1. Connect the External Hard Disk:
    • Plug your external hard disk into your computer’s USB port.
    • Wait for the drive to appear on your computer screen, typically under “This PC” or “My Computer.”
  2. Access Control Panel:
    • Click on the Windows logo (usually a flag) at the bottom of your screen.
    • In the menu that appears, select “Control Panel.”
  3. Navigate to Backup Settings:
    • In the Control Panel, click on “System and Security.”
    • Look for and click on “Backup” or “File History” in the System section.
  4. Set Up File History:
    • If using an external drive, File History should automatically detect it.
    • If multiple drives are connected, use the “Select Drive” option to choose your primary backup location.
  5. Adjust Advanced Settings (Optional):
    • Click on the “Advanced Settings” link within File History settings.
    • Modify backup frequency, cache size, and network access options as needed.
  6. Schedule Automatic Backups:
    • Ensure that backups are set to run automatically or at a specified time.
    • Use the “Run Now” option if you need immediate backup.
  7. Test Your Backup System:
    • Delete or move an important file to simulate a data loss scenario.
    • Restore the file from File History using the steps provided in the restore guide (located in the same section).

Important Considerations:

  • File Types: Understand that not all files are backed up by File History, including encrypted files (EFS), network-located files, and drives that don’t use NTFS.
  • Network Access: Decide whether other family members should have access to your backup drive. This can be adjusted in the settings.

Conclusion: By following these steps, you can effectively set up File History on Windows 8/8.1, ensuring your important files are backed up and accessible when needed. This process helps in maintaining data security and peace of mind for students and casual users alike.

Stop ESD—Don’t Fry Your PC!

review

ESD

Electrostatic discharge (ESD) is a hidden threat that can harm your computer and its components, especially when you’re tinkering with your system. ESD occurs when two objects with different electrical charges come into contact or get too close. Even if you don’t see sparks or feel a shock, ESD can cause serious damage to sensitive electronics like CPUs and memory modules. In fact, as little as 100 volts—something you might not even notice—is enough to ruin your hardware, while 800 volts could give you a noticeable tingle.

To protect your PC from ESD while working on it, try these tips :

Use antistatic wipes to clean your computer case and monitors before disassembling them.
Dress appropriately—opt for cotton or natural fibers when working on your PC. At home, avoid synthetic-soled shoes and work in your stocking feet (or cotton socks) to minimize static buildup.
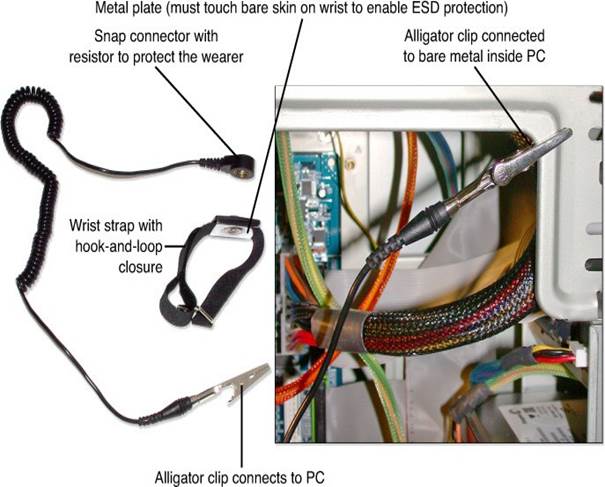
Invest in anti-ESD gear. A grounded wrist strap with an alligator clip and an antistatic mat can help neutralize static electricity. Make sure to connect the alligator clip to the computer after disconnecting it from power, as this equalizes the electrical potential between you and the machine.
Hold components safely—grasp them by their case or card bracket, never by the circuit board or data/power connector.

Avoid These ESD Mistakes
Don’t use a wrist with jewelry like a watch or bracelets.
Ensure the strap is snug against your skin to avoid hair interfering with protection.
Attach the alligator clip properly to a metal part of your PC’s chassis, such as the power supply grill or drive bay frame.

For added protection, consider a field service kit that includes both a grounding strap for your body and a grounded parts mat for components you’re installing or removing.

Where to Find ESD Protection
Looking for anti-ESD tools? Check these online sources:
e-Mat—www.anti-staticmat.com

By following these tips and avoiding common mistakes, you can protect your PC from ESD damage. Stay informed, stay grounded, and keep your hardware safe!

Setting Up Windows Backup (Windows 7) – A Simple Guide for Younger Students

Using Windows Backup on Windows 7 is an easy way to save your important files and create a backup of your computer. Let’s go through the process step by step in simple terms.

  1. Press the Windows Logo: At the bottom of your screen, press the Windows logo (the flag-shaped button).
  2. Go to Settings: Click on the “Settings” option you’ll find on the left side of the Start menu.
  3. Find Backup Options: In the Settings menu, look for an option labeled “Backup.” It might be under a section like “System.”
  4. Connect Your Backup Device:
    • If you’re using an external hard drive or USB stick, plug it into your computer.
    • Make sure the drive shows up on your screen (you might see the device name appear near the connection points).
  5. Start Backing Up:
    • Click on “Backup Now” or whatever button is labeled for backing up your files.
    • Choose where you want your backup to go. It can be on your external drive or another location if needed.
  6. Review and Complete: After selecting your backup location, follow any additional instructions to ensure everything is set up correctly.
  7. Create an Emergency Backup Disk:
    • If you need to restore your computer in the future, create a special backup CD or DVD using the Windows 7 installation disc.
    • This is especially important if you have Windows pre-installed and might not have access to external drives during recovery.
  8. Save Your Work: Once everything is set up, your files will be copied to the chosen location. You’ll get an update on how much of your backup is complete.

By following these easy steps, you can protect your important files and ensure that your computer stays running smoothly for years to come!