Battery Testing

Troubleshooting Charging Issues with Your Smartphone or Tablet

If your smartphone or tablet won’t charge with the charger it came with, the problem might be with the charger or the cable. Here’s a simple way to check:

  1. Check the Charger: Make sure the charger is plugged into a working wall outlet or a surge protector that is turned on.
  2. Test the Cable: Try using a different cable that you know works, or a new one if you don’t have a known good cable. If your device charges with the new cable, recycle the old one. If it still doesn’t charge, move to step 3.
  3. Test the Charger: Use a different charger that you know works, while keeping the original cable. If your device charges, recycle the old charger. If it still doesn’t work, go to step 4.
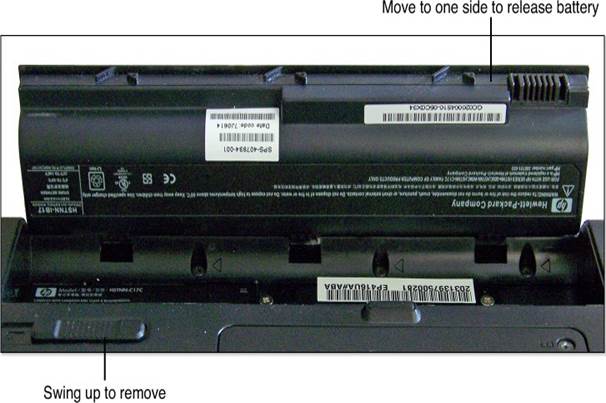
  4. Check the Battery: If your device has a removable battery, take it out, clean the contacts, and put it back in. Then try charging again. If it still won’t charge, you may need to replace the battery or get the device serviced.

Testing Your Battery

You can test your battery in a few ways:

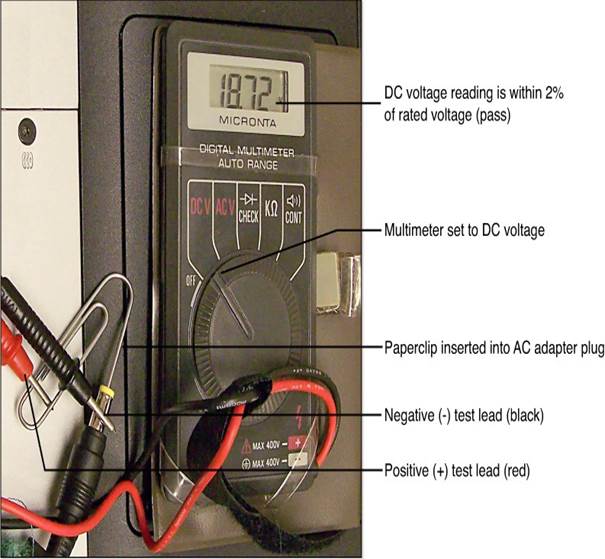
  • Use a Multimeter: Set it to the battery’s voltage (DC current). Check the battery to find the positive (+) and negative (–) terminals. Connect the red lead to the positive terminal and the black lead to the negative terminal.
  • Use a Battery Tester: This device can also check the battery’s voltage.
  • Try the Battery in Another Device: If the device doesn’t turn on, the battery might be dead.

If a rechargeable battery doesn’t hold a charge or runs out quickly, recycle it. If a regular battery (like alkaline or lithium) fails, replace it and dispose of it properly.

Battery Not Charging or Holding a Charge

If your device works when plugged in but not on battery power, check these things:

  • Battery Installation: Make sure the battery is installed correctly.
  • Clean Contacts: Wipe off any dirt or corrosion on the battery and its contacts.
  • Battery Health: Ensure the battery can hold a charge. Leave the device plugged in for the recommended time, then try using it on battery power. If it doesn’t work or runs out quickly, replace the battery if you can. If not, the device may need servicing.
  • Check for Damage: If the battery feels hot after charging or looks warped, it might be damaged and should be replaced.

Choosing the Right Battery

When buying batteries for your devices, consider these tips:

  • Rechargeable vs. Disposable: Rechargeable batteries can be used many times, but not all devices work with them. Check your device’s manual before switching.
  • mAh Rating: Look for batteries with a higher mAh rating for longer use between charges.
  • Types of Batteries: Stick to alkaline or lithium batteries for best performance. Avoid cheaper options like “heavy duty” batteries.
  • High-Drain Devices: For devices that use a lot of power, like cameras, use lithium batteries for the best results.

Proprietary Batteries

If you need a battery for a laptop or camera, be prepared for higher prices. Original batteries can be expensive, but many third-party options are available for less money and can work just as well.

Built-in Batteries

For devices with built-in batteries, like some Apple products, you’ll need to get the device serviced if the battery fails. Refurbished devices usually have new batteries, but be cautious with third-party refurbishing.

Tips to Extend Battery Life

To help your battery last longer, try these tips:

  • Lower Screen Brightness: Use the lowest brightness that works for you.
  • Shorten Display Time: Reduce the time your screen stays on when not in use.
  • Use Sleep Mode: Close your laptop to put it to sleep.
  • Close Unused Apps: Shut down apps you aren’t using.
  • Avoid Extreme Temperatures: Keep your device in a comfortable temperature range for best performance.

Laptop Power Issues

Laptop Power Issues

Troubleshooting Laptop Power Problems
If your laptop isn’t turning on and you don’t have a multimeter, you can do a simple test on the AC adapter. First, unplug it from the wall and take out the laptop battery.

Next, plug the AC adapter back in and try to turn on the laptop. If it powers on, the AC adapter is working fine.
It’s also important to check the label on the AC adapter to find out its wattage, output voltage, and polarity. This information is useful if you need to test the adapter or buy a new one. For example, many laptop adapters output 19V DC, with the positive connection in the middle of the plug and the negative on the outside.
If your laptop won’t run without the battery while it’s plugged in, check these things:
Check the Outlet: Make sure the laptop is plugged into a working outlet. You can test this by plugging in a lamp or clock radio to see if it works. You can also use a portable outlet tester or a multimeter set to AC voltage to check if the outlet is providing power.
Check the Power Cord: Ensure that the power cord from the outlet to the adapter is securely plugged in at both ends. If the cord or plug looks damaged, you should replace it.
Test the Adapter Voltage: To see if the adapter is giving the right DC voltage, use a voltmeter or multimeter set to DC voltage. Compare the reading to the values on the adapter label. Sometimes, you might need to use a bent paper clip to get an accurate reading. A voltage that is within ±5% of the rated value is acceptable.
By following these steps, you can figure out what might be wrong with your laptop’s power supply..

Router Setup

To make the most of the tips in this section, you may need to change some settings on your wireless router. Here’s how to get started:

  1. Even if you usually connect to your router wirelessly, plug an Ethernet cable into one of the router’s ports and connect it to your computer. Most routers need a wired connection to change settings, even if some can be managed wirelessly.
  2. Open your web browser and type in your router’s IP address. If you don’t know what it is, check the instructions that came with your router. You can usually find a PDF or webpage from the router company.
  3. When prompted, enter the username and password. The default information is in your router’s instructions. If you’ve changed these, make sure to write them down somewhere.

To find your computer’s IP information, you can use the command prompt and type IPConfig/all. Look for the Default Gateway listed for your Ethernet connection; this is your router’s IP address.

To change wireless settings like the network name (SSID), security options, password, and channel, go to the Wireless Setup section.

If you need to set up a device using WPS, go to the Wi-Fi Protected Setup section.

You can also check the Device and Client table to see the names and MAC addresses of devices connected to your network.

If some gaming systems are having trouble connecting to the Internet, you might need to set up port forwarding or allow direct Internet access for a specific device (known as DMZ). Look for these options in the advanced settings of your router.

After making your changes, remember to save them (some routers have a Save button at the bottom of the page) and close your browser. If you don’t usually use a wired connection, you can unplug the Ethernet cable from your computer but keep it connected to the router for future use.

Firmware Updates

Firmware is the software that controls how your router and mobile devices work. Updates to firmware can fix problems or add new features.

To update a smartphone or tablet, contact your service provider or the device maker.

For more details on updating, check the relevant section in your guide.

Updating Your Router

You can get firmware updates for your router from two places:

  1. The router manufacturer
  2. A third-party firmware provider, like DD-WRT

Getting Updates from the Manufacturer:

  1. Find the model and version number of your router, usually found on a label on the bottom or side. Different models may need different updates, so it’s important to know exactly which one you have.
  2. Log in to your router to check the current firmware version. This info is often on the login page or in the settings; refer to your router’s instructions for help.
  3. Visit the manufacturer’s website and go to the Support or Downloads section. Look for your router model to see available firmware updates and what issues they fix.
  4. If a new firmware version can solve your router problems, download it. The latest version usually includes all previous fixes.
  5. Before installing the new firmware, write down your current router settings. You can take screenshots or use a camera. This is important if you’ve changed the default login info or set up special features, as some settings might be lost during the update.
  6. Follow the instructions in your router’s documentation or on the website to install the firmware. You’ll likely need to log in with a wired connection. If your router has a USB port, you may need to copy the firmware update file to a USB drive.
  7. After the update, restart your router.
  8. Reapply any custom settings that may have changed during the update using the notes you made earlier.

Caution:

If the new firmware causes problems, you might want to try an earlier version. It’s best to update firmware only when it fixes a specific issue on your network, not just because a new version is available.

Airplane Mode vs. Wi-Fi Mode

If you can’t connect your mobile device to Wi-Fi or a cellular network, it might be in Airplane mode. Airplane mode turns off all wireless signals on your device, including Wi-Fi, Bluetooth, and cellular connections. This feature was created so people could use their devices during flights, but it has other benefits too:

  • Longer battery life
  • Increased privacy

When Airplane mode is on, you’ll see a small airplane icon on your device’s screen.

To turn on Airplane mode, go to the Settings menu on your device. On Windows 8/8.1, you can find it in the Networks menu.

By default, Airplane mode disables all communication, but you can still turn on Wi-Fi or Bluetooth if you want. This is useful if you’re traveling outside your cellular network area or in another country, as it can help you save money.

Switching Connection Types Manually

When using a mobile device that has both Wi-Fi and cellular data, remember that you can only use one at a time. Usually, Wi-Fi is on all the time and connects automatically when you return to a familiar hotspot, like your home or school.

However, if you find yourself connected to a weak Wi-Fi signal that doesn’t work well, but you have a strong cellular signal, you can switch to cellular data by following these steps:

  1. Go to your device’s Settings and turn off Wi-Fi.
  2. Your device should automatically connect to the cellular network.
  3. When you’re back in an area with a strong Wi-Fi signal, turn Wi-Fi back on.

Mobile Hotspots and Connection Security

You might see signs for “Free Wi-Fi” in places like hotels, restaurants, and coffee shops, but be careful using these networks. They are often not secure, which means your personal information, like emails and bank details, could be at risk. Free Wi-Fi is fine for casual browsing, but it’s not safe for important tasks like online banking.

If you have a secure remote connection service on your home or office computer, like Go To My PC, you can use that to check emails or shop online safely by accessing your remote computer.

Using Your Device as a Hotspot

If you have a smartphone, tablet, or laptop that can share its cellular data, you can create a secure connection for other devices. You can share your connection with one device using USB tethering or with multiple devices using the Wi-Fi hotspot feature.

Using USB Tethering

To use USB tethering, follow these steps:

  1. Connect a USB cable from your computer to your device.
  2. Turn on the USB tethering option on your device.
  3. If you’re using a Windows computer, select the network type (Home) when prompted.
  4. Use your computer’s web browser and other network features as usual.
  5. When you’re done, turn off USB tethering.

In the Device Manager, you’ll see the tethered connection listed as a Remote NDIS based Internet Sharing Device.

Using a Wi-Fi Hotspot

To use the mobile hotspot feature, do the following:

  1. Turn on the mobile hotspot feature.
  2. Choose how you want to share your connection wirelessly.
  3. If you want to allow only certain devices to connect, you’ll need to provide a name and MAC address for each device. The MAC address can usually be found on a label or by using the command prompt on your computer.
  4. Open the Allowed devices menu, add the MAC address, and save it.
  5. Each device will need the SSID (network name) and password to connect to your hotspot.
  6. Connect just like you would to any other Wi-Fi network by entering the password when asked.
  7. When you’re finished using the internet, remember to turn off the hotspot feature.

Caution

Some mobile providers may charge extra fees for using your device as a hotspot. Check with your service provider for details. Also, keep in mind that all data used by devices connected to your hotspot counts toward your data limit, so be careful to avoid extra charges.

Installing and Using Powerline Adapters

Powerline adapters, also known as HomePlug, are a great way to extend your internet connection using your home’s electrical wiring. While they might not be as popular as Ethernet or Wi-Fi, they can be very helpful when you can’t easily extend a wireless signal to other areas of your home or office.

A HomePlug network consists of two main parts:

  1. One adapter plugs into a wall outlet and connects to your router or switch using an Ethernet cable.
  2. The second adapter plugs into another wall outlet, allowing you to connect your device with another Ethernet cable.

Some kits come with a second adapter that also has Wi-Fi capability. This means you can connect your device either with a wired Ethernet cable or wirelessly through Wi-Fi.

The older HomePlug standard offered speeds of 85Mbps, but it has been updated to faster versions like HomePlug AV (200Mbps) and HomePlug AV2 (500Mbps). You can tell which version you have by looking at the speed rating of the adapter.

If you want to connect more devices, you can buy an additional compatible adapter. If the devices are close to the second adapter, you can connect it to a Fast or Gigabit Ethernet switch to share the internet connection with multiple devices.

To set up the connection between the two adapters, simply plug them in and press a button on each one to pair them together. You can use more than two adapters in most HomePlug networks.

Powerline adapters are especially useful in homes with thick walls or concrete construction because they can work well even when there are solid barriers blocking the signal.

Speeding Up a Slow Wired Network

Even though wireless networking gets a lot of attention, wired networking, also known as Ethernet, is still very useful. Here are some reasons why:

  • Security: Ethernet can’t be accessed by neighbors or strangers like Wi-Fi can.
  • Simplicity: Setting up Ethernet is easy—just plug it in!
  • Speed: Gigabit Ethernet is faster than most wireless networks, except for Wireless-AC.

If you already have Ethernet cables installed or can hide short cables behind furniture, using wired networking can be a better choice, especially if you have thick walls that slow down Wi-Fi.

Gigabit Ethernet (1000Mbps) is the fastest type of wired Ethernet for home use. It’s quicker than most wireless connections, making it great for sharing files, streaming videos, and printing over the network. Here’s how to check if you’re using Gigabit Ethernet:

  1. Go to a Windows computer that is connected to the network with an Ethernet cable.
  2. Open the Network and Sharing Center from the Control Panel or the Network menu.
  3. Double-click on the Local Area Connection shortcut.
  4. Look for the connection speed in the status box that appears.
  5. Close the status window and any other open dialogs.

If your network is running at Fast Ethernet (100Mbps), you can check three things to see if you can upgrade to Gigabit Ethernet:

  1. Cabling: Gigabit Ethernet needs CAT5e or CAT6 cables. Fast Ethernet can use CAT5 cables but can also work with faster ones.
  2. Computer Ports: Most newer computers with Ethernet ports support Gigabit Ethernet.
  3. Router or Switch Ports: Many low-cost routers and switches only have 10/100 (Fast Ethernet) ports, while newer models usually have 10/100/1000 ports that support both Fast and Gigabit Ethernet.

Checking Your Network Cable

To find out what type of Ethernet cable you have, look at the cables themselves. If your cables are built into the wall, you might see the markings by checking the RJ-45 wall jack. You can also hire someone to test your network for Gigabit Ethernet compatibility. If your cables were installed during construction, ask your builder what type was used.

If all the cables connecting your router and computers are CAT5e or CAT6, your network can run at Gigabit speeds. If you find CAT5 cables, don’t replace them until you check if your computers have Gigabit Ethernet ports.

Checking Your Computers for Gigabit Ports

To see if your computer’s network port supports Gigabit Ethernet, follow these steps:

  1. Open Windows Explorer (Windows 7) or File Explorer (Windows 8/8.1).
  2. Right-click on Computer (Windows 7) or This PC (Windows 8/8.1) and select Properties.
  3. Open Device Manager.
  4. Expand the Network Adapters section.
  5. Look for an entry that says Gigabit Ethernet, GBE, or something similar.

If you can’t find the information in Device Manager, search online for the name of your network adapter to see what speed it supports.

Checking Your Router or Switch

To find out if your router or switch supports Gigabit Ethernet, you can:

  • Access the router or switch, find its name and version number, and look up its specifications online. Many newer routers that support the fastest wireless standard (802.11ac) also support Gigabit Ethernet.
  • If you can’t access the router or switch, compare the speeds supported to the network connection status. If the cables used are CAT5e or CAT6 and the network adapter supports Gigabit Ethernet, but the router only supports Fast Ethernet, you won’t get Gigabit speeds.

Other things that can slow down your network include poor-quality keystone jacks (the wall plugs for Ethernet), female/female Ethernet adapters (used to connect two cables), or using Ethernet hubs.

If your network has Ethernet hubs, replace them with Ethernet switches. Hubs split the total connection speed among all connected devices. For example, if you have a Fast Ethernet hub with four devices connected, each device only gets 25Mbps.

Fixing Wi-Fi Signal Strength Issues

When using Wi-Fi, the farther away you are from your router, the weaker the signal will be. Wireless-N and Wireless-AC routers are made to help with this by using multiple antennas to improve range and performance. Also, the 2.4GHz frequency can reach farther than the 5.0GHz frequency.

How to Check Your Signal Strength

To see if you have a signal problem, you can do a simple test. If you have a device that can use both 2.4GHz and 5.0GHz signals, and a router that supports both, check the signal strength as you move around your home. Usually, the 2.4GHz signal will be stronger than the 5.0GHz signal when you’re farther away from the router.

For a better look at your signal strength, you can download a free app called Wifi Analyzer on your Android phone or tablet. This app shows you the strength of your Wi-Fi signal in real time, so you can see how it changes as you move around your space.

Sometimes, you might find areas in your home or office where the signal is very weak. Even if you upgrade to a better router with more antennas, you might still have issues with devices like smartphones, tablets, and portable gaming systems.

Here are three ways to improve your Wi-Fi signal:

  1. Adjust Antenna Positioning
  2. Install Signal Boosters or Repeaters
  3. Use Powerline Adapters

Improving Antenna Positioning

The antennas on your router and the adapters your devices use are important for getting a better signal.

  • If your router has external antennas, try changing their angles to see if that helps.
  • If your router has internal antennas, consider placing it on a wall or turning it to a different angle.
  • Position your router in the center of your home or office for the best coverage, as it sends signals in all directions. If it’s near an outside wall, much of the signal may be going outside instead of into your space.

If you use a USB wireless adapter, you can use a USB extension cable to move it closer to a window or a better spot for a stronger signal.

Using a Signal Repeater

If changing the position of your router or antennas doesn’t help, you can use a signal repeater. A repeater picks up the Wi-Fi signal from your router and sends it out again, helping to extend the range.

Some repeaters plug directly into a wall outlet, while others look like small routers and may have Ethernet ports.

Setting Up a Signal Repeater:

  1. Decide where to place the repeater.
  2. Plug it into a power source.
  3. If your devices support Wi-Fi Protected Setup (WPS), press the WPS button on both the router and the repeater, or use the PIN method if needed.
  4. To connect to the repeater, find it in the list of available networks and enter the password if asked.

For some models, the setup might be a bit different:

  1. Choose a spot for the repeater.
  2. Plug it in.
  3. Use a web browser to log into the repeater’s settings (check the instructions for the right IP address).
  4. If the repeater has a signal strength checker, use it to make sure it’s getting a good signal from the router. Adjust its position if necessary.
  5. Set the names (SSIDs) for the 2.4GHz and 5.0GHz channels. You might want to add “_RE” to the name to show it’s a repeater.
  6. Decide if you want to use the same password or create a new one.
  7. Save your changes and exit.
  8. To connect to the repeater, select it from the list of networks and enter the password if needed.

By following these steps, you can improve your Wi-Fi signal and enjoy a better internet experience throughout your home or office.

Your Home Network

Handling Slow and Unsecure Devices on Your Home Network


When it comes to network security, the weakest device can make everything less safe. Since wireless networking has been around for over a decade, you might have various devices connected to your network, and some of them may not support WPA2, which is the best Wi-Fi security option. This can slow down your network. Here are some common devices that might cause issues:
Older Wireless-G (802.11g) routers or adapters
Old portable gaming systems
It’s usually easy to replace outdated routers and adapters, including those for gaming. For instance, the original Microsoft Xbox 360 Wireless Network Adapter only worked with older Wi-Fi standards. You can upgrade to the Xbox 360 Wireless N Network Adapter for better performance.
However, replacing older portable gaming systems can be trickier. For example, while Nintendo’s newer handheld systems (like the 2DS and 3DS) use WPA2, they still support older DS games that only work with WEP encryption. If you want to play those games, you can’t change the security settings.
To keep everyone in the family happy, consider these options: use Guest mode or set up weaker encryption for older devices.
Using Guest Mode
If your wireless router has a Guest mode, you can use it to let older devices connect to the internet without lowering the security for newer devices. This mode is also great for allowing friends and family to access your network safely, as it prevents them from using your network printers or shared files. Depending on your router, Guest mode might only work on the 2.4GHz band or on both 2.4GHz and 5.0GHz bands. While it doesn’t use encryption, users will need to enter a password you set up.
Setting Up a Secure Wireless Network
If you’re looking to secure your network, here are some tips. You usually have two options for setting it up:
Manually enter encryption keys.
Use Wi-Fi Protected Setup (WPS).
Encryption Keys: Problems and Solutions
When using WPA2 (the preferred option) or WPA encryption, you have three choices for setting up your router:
Up to 63 characters using letters, numbers, and symbols
Up to 63 characters using only letters and numbers
64 hex characters (numbers 0-9 and letters A-F)
Whatever you choose for your router must be used for every device that connects to your network. To avoid typing the encryption key multiple times, save it in a text file on a USB drive for easy access later.
Why ASCII Works for Encryption Keys
Which option is best? Some devices may not accept certain symbols or hex characters, so it’s often easier to use a long ASCII text or numeric key. A good length is between 30 to 50 characters, as some devices may struggle with keys close to 60 characters.
Creating a Strong Yet Memorable Encryption Key
A short encryption key can be easy to guess, so longer is better. Instead of using a random password that’s hard to remember, create a key using a mix of words and numbers that you can recall. For example, you could use a fun combination like “LukeSkywalker3Jawas2Wookie1DeathStar0LeiaOrgana5snubfighter.”
Wi-Fi Protected Setup: Problems and Solutions
If you’ve set up encryption keys before, you know they can be long and tricky to type. To make things easier, many routers support Wi-Fi Protected Setup (WPS). With WPS, you can set up your devices in three ways:
Press a button on the router and the device.
Enter a PIN number from the device into the router.
Enter a PIN number from the router into the device.
While WPS is convenient, it may not be the safest option. Some routers allow you to disable WPS due to security concerns. Always check the instructions for new devices before using WPS, as it can sometimes disrupt existing connections. A good rule of thumb is to stick with WPS if you’ve been using it, but if you’ve been setting up your network manually, it’s best to keep doing that.
Not all devices support WPS, so make sure both your router and device are compatible. The latest version of WPS also supports NFC (near field communication), which allows devices to connect just by being close to each other. However, both the router and device need to support this feature to use it.

Wireless-G adapter to new Wireless-N

To optimize your wireless network’s performance with an older computer equipped with a Wireless-G adapter and a newer Wireless-N router, consider the following organized steps:

  1. Assess Current Setup:
    • Identify the capabilities of your laptop’s built-in adapter (e.g., Broadcom 4313GN supporting up to 300Mbps on Wireless-N).
    • Note the actual speed when connected to your N900 router, which may be lower than expected.
  2. Consider External Adapter Options:
    • Explore external USB adapters like the Netgear N600, which can provide better performance than built-in adapters.
    • Ensure the USB adapter supports higher speeds and has advanced features that your laptop’s built-in adapter may lack.
  3. Disable Built-In Adapter:
    • Use Device Manager to disable the built-in Wireless-G adapter to eliminate competition for network resources.
    • This step ensures that the external adapter can fully utilize the router’s capabilities without interference.
  4. Switch Channels for Better Performance:
    • Connect the USB adapter to the 5GHz band if possible, as this band typically offers less interference and higher speeds compared to 2.4GHz.
    • Check network traffic on both bands to choose the least congested one.
  5. Enable WPA2 Encryption:
    • Ensure your router is using WPA2 encryption for the best security and maximum speed.
    • This setting helps protect your network and ensures optimal performance.
  6. ** Monitor and Optimize Router Settings:**
    • Adjust router settings to prioritize certain devices or channels if needed.
    • Regularly check for updates and firmware to maintain peak performance.
  7. Test and Compare:
    • Test the connection speed both before and after enabling the external adapter and switching channels.
    • Note improvements in activities like streaming video or file transfers.

By following these steps, you can enhance your network’s speed and reliability, ensuring that your older computer runs smoothly on a modern network.

Speeding Up Your Wireless Network: A Simple Guide

Is your wireless network running slow? It can be frustrating, but there are easy ways to fix it. Let’s break it down.

Why Your Network Might Be Slowing Down

  1. Older Encryption Methods: Just like using an older, slower car model, outdated encryption like WEP or WPA can make your network go slower and be less secure.
  2. Channel Congestion: Imagine a busy highway with too many cars (other networks). If your router is using a channel that’s already crowded, your internet speed will suffer.
  3. Device Compatibility: Some older devices might not support newer standards like Wireless-N or Wireless-AC, making your network run at a slower pace.

How to Boost Your Network’s Speed

  1. Upgrade Your Encryption: Use WPA2 encryption for the best security and fastest speeds. It’s like adding the latest safety features to your digital car.
  2. Choose a Less Crowded Lane (Channel): Just like picking a lane with less traffic, check online tools to find a channel that’s less busy. This can help reduce interference and improve your connection.

Understanding Your Devices

  • Speed varies based on devices: A newer device might need the 5GHz band for faster speeds, while older ones stick to 2.4GHz.
  • Antennas matter: More antennas mean better performance. So, look for routers with multiple antennas if you want a faster connection.

Practical Steps You Can Take

  1. Check Your Router Settings: Make sure your router is using WPA2 encryption and that it’s set to use both 2.4GHz and 5GHz bands.
  2. Use Channel Analyzer Tools: Online tools can help you pick the best channel for your area, avoiding those with heavy traffic.

Summary

By understanding how your network works and making smart choices about channels and security, you can turn a slow, insecure connection into a fast, reliable one. It’s like optimizing your digital highway to avoid traffic jams and accidents.

With these tips, anyone can improve their wireless network’s performance and enjoy a smoother online experience.