Fixing Wi-Fi Signal Strength Issues

When using Wi-Fi, the farther away you are from your router, the weaker the signal will be. Wireless-N and Wireless-AC routers are made to help with this by using multiple antennas to improve range and performance. Also, the 2.4GHz frequency can reach farther than the 5.0GHz frequency.

How to Check Your Signal Strength

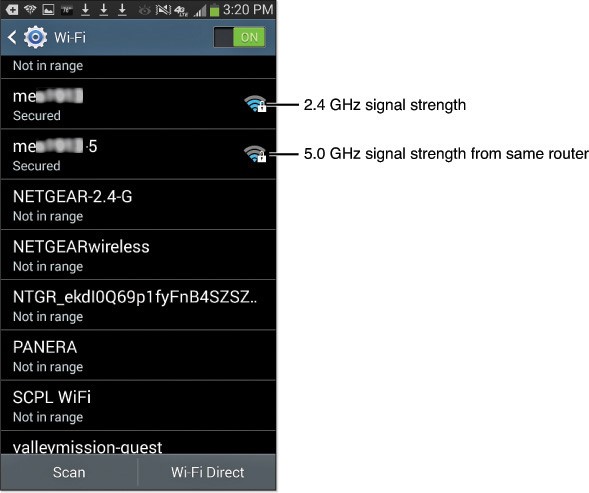
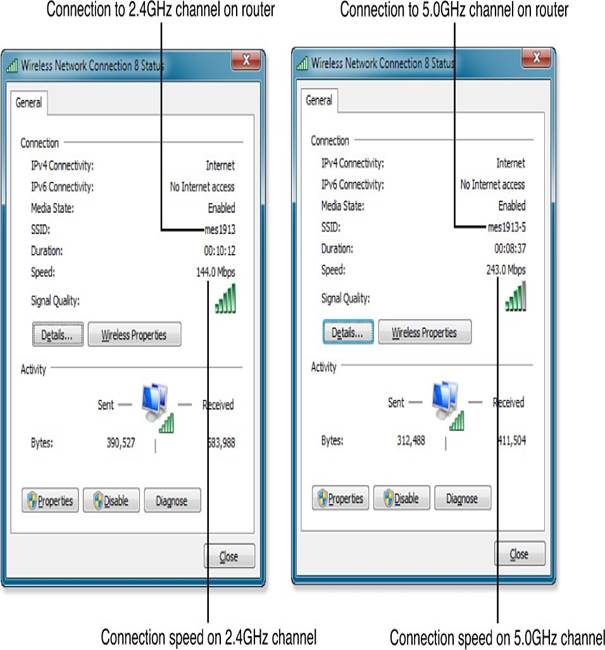
To see if you have a signal problem, you can do a simple test. If you have a device that can use both 2.4GHz and 5.0GHz signals, and a router that supports both, check the signal strength as you move around your home. Usually, the 2.4GHz signal will be stronger than the 5.0GHz signal when you’re farther away from the router.

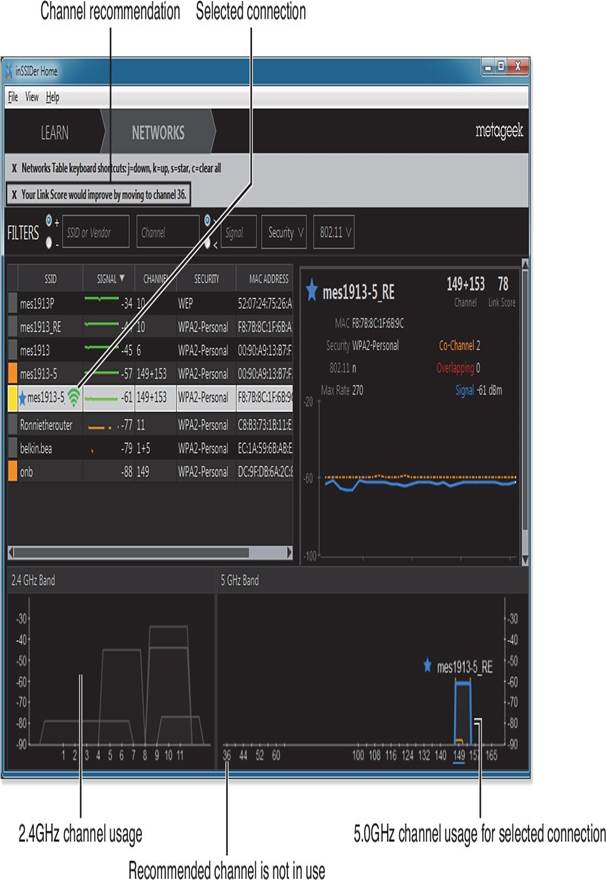
For a better look at your signal strength, you can download a free app called Wifi Analyzer on your Android phone or tablet. This app shows you the strength of your Wi-Fi signal in real time, so you can see how it changes as you move around your space.

Sometimes, you might find areas in your home or office where the signal is very weak. Even if you upgrade to a better router with more antennas, you might still have issues with devices like smartphones, tablets, and portable gaming systems.

Here are three ways to improve your Wi-Fi signal:

  1. Adjust Antenna Positioning
  2. Install Signal Boosters or Repeaters
  3. Use Powerline Adapters

Improving Antenna Positioning

The antennas on your router and the adapters your devices use are important for getting a better signal.

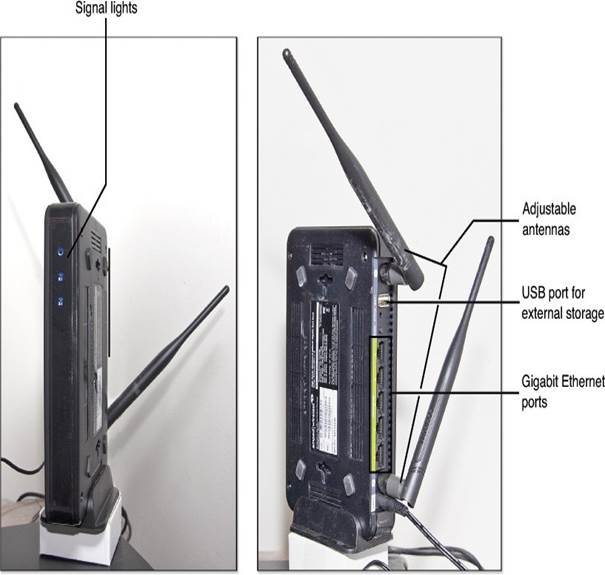
  • If your router has external antennas, try changing their angles to see if that helps.
  • If your router has internal antennas, consider placing it on a wall or turning it to a different angle.
  • Position your router in the center of your home or office for the best coverage, as it sends signals in all directions. If it’s near an outside wall, much of the signal may be going outside instead of into your space.

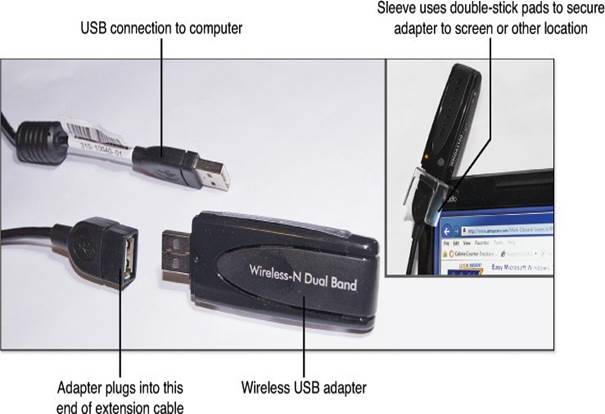
If you use a USB wireless adapter, you can use a USB extension cable to move it closer to a window or a better spot for a stronger signal.

Using a Signal Repeater

If changing the position of your router or antennas doesn’t help, you can use a signal repeater. A repeater picks up the Wi-Fi signal from your router and sends it out again, helping to extend the range.

Some repeaters plug directly into a wall outlet, while others look like small routers and may have Ethernet ports.

Setting Up a Signal Repeater:

  1. Decide where to place the repeater.
  2. Plug it into a power source.
  3. If your devices support Wi-Fi Protected Setup (WPS), press the WPS button on both the router and the repeater, or use the PIN method if needed.
  4. To connect to the repeater, find it in the list of available networks and enter the password if asked.

For some models, the setup might be a bit different:

  1. Choose a spot for the repeater.
  2. Plug it in.
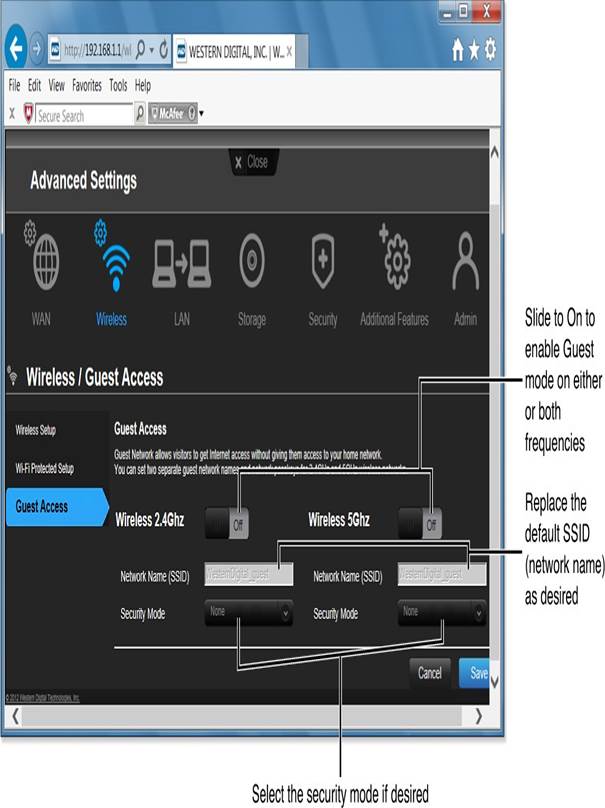
  3. Use a web browser to log into the repeater’s settings (check the instructions for the right IP address).
  4. If the repeater has a signal strength checker, use it to make sure it’s getting a good signal from the router. Adjust its position if necessary.
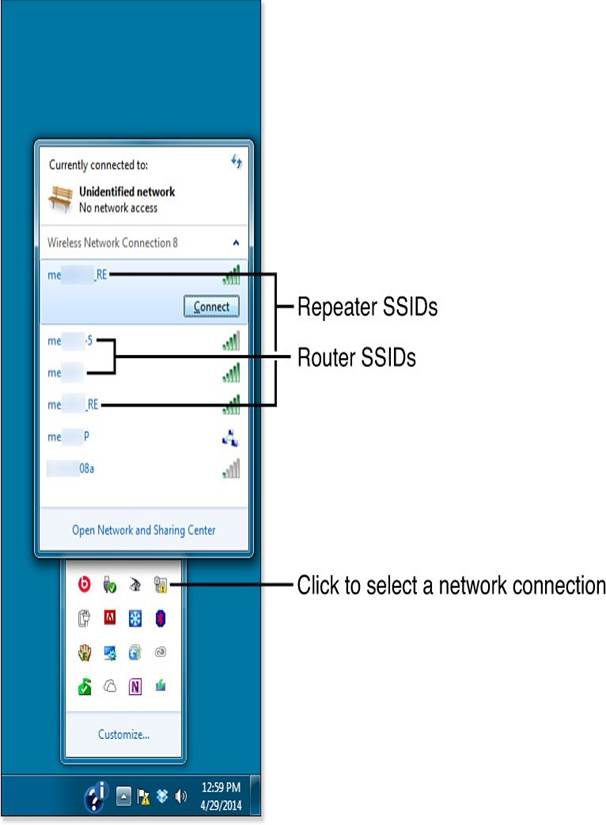
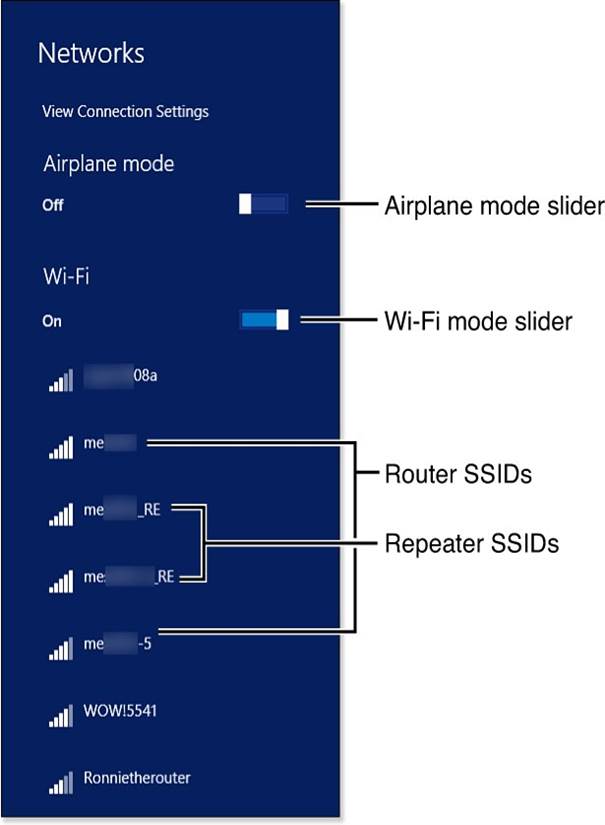
  5. Set the names (SSIDs) for the 2.4GHz and 5.0GHz channels. You might want to add “_RE” to the name to show it’s a repeater.
  6. Decide if you want to use the same password or create a new one.
  7. Save your changes and exit.
  8. To connect to the repeater, select it from the list of networks and enter the password if needed.

By following these steps, you can improve your Wi-Fi signal and enjoy a better internet experience throughout your home or office.

Your Home Network

Handling Slow and Unsecure Devices on Your Home Network


When it comes to network security, the weakest device can make everything less safe. Since wireless networking has been around for over a decade, you might have various devices connected to your network, and some of them may not support WPA2, which is the best Wi-Fi security option. This can slow down your network. Here are some common devices that might cause issues:
Older Wireless-G (802.11g) routers or adapters
Old portable gaming systems
It’s usually easy to replace outdated routers and adapters, including those for gaming. For instance, the original Microsoft Xbox 360 Wireless Network Adapter only worked with older Wi-Fi standards. You can upgrade to the Xbox 360 Wireless N Network Adapter for better performance.
However, replacing older portable gaming systems can be trickier. For example, while Nintendo’s newer handheld systems (like the 2DS and 3DS) use WPA2, they still support older DS games that only work with WEP encryption. If you want to play those games, you can’t change the security settings.
To keep everyone in the family happy, consider these options: use Guest mode or set up weaker encryption for older devices.
Using Guest Mode
If your wireless router has a Guest mode, you can use it to let older devices connect to the internet without lowering the security for newer devices. This mode is also great for allowing friends and family to access your network safely, as it prevents them from using your network printers or shared files. Depending on your router, Guest mode might only work on the 2.4GHz band or on both 2.4GHz and 5.0GHz bands. While it doesn’t use encryption, users will need to enter a password you set up.
Setting Up a Secure Wireless Network
If you’re looking to secure your network, here are some tips. You usually have two options for setting it up:
Manually enter encryption keys.
Use Wi-Fi Protected Setup (WPS).
Encryption Keys: Problems and Solutions
When using WPA2 (the preferred option) or WPA encryption, you have three choices for setting up your router:
Up to 63 characters using letters, numbers, and symbols
Up to 63 characters using only letters and numbers
64 hex characters (numbers 0-9 and letters A-F)
Whatever you choose for your router must be used for every device that connects to your network. To avoid typing the encryption key multiple times, save it in a text file on a USB drive for easy access later.
Why ASCII Works for Encryption Keys
Which option is best? Some devices may not accept certain symbols or hex characters, so it’s often easier to use a long ASCII text or numeric key. A good length is between 30 to 50 characters, as some devices may struggle with keys close to 60 characters.
Creating a Strong Yet Memorable Encryption Key
A short encryption key can be easy to guess, so longer is better. Instead of using a random password that’s hard to remember, create a key using a mix of words and numbers that you can recall. For example, you could use a fun combination like “LukeSkywalker3Jawas2Wookie1DeathStar0LeiaOrgana5snubfighter.”
Wi-Fi Protected Setup: Problems and Solutions
If you’ve set up encryption keys before, you know they can be long and tricky to type. To make things easier, many routers support Wi-Fi Protected Setup (WPS). With WPS, you can set up your devices in three ways:
Press a button on the router and the device.
Enter a PIN number from the device into the router.
Enter a PIN number from the router into the device.
While WPS is convenient, it may not be the safest option. Some routers allow you to disable WPS due to security concerns. Always check the instructions for new devices before using WPS, as it can sometimes disrupt existing connections. A good rule of thumb is to stick with WPS if you’ve been using it, but if you’ve been setting up your network manually, it’s best to keep doing that.
Not all devices support WPS, so make sure both your router and device are compatible. The latest version of WPS also supports NFC (near field communication), which allows devices to connect just by being close to each other. However, both the router and device need to support this feature to use it.

Wireless-G adapter to new Wireless-N

To optimize your wireless network’s performance with an older computer equipped with a Wireless-G adapter and a newer Wireless-N router, consider the following organized steps:

  1. Assess Current Setup:
    • Identify the capabilities of your laptop’s built-in adapter (e.g., Broadcom 4313GN supporting up to 300Mbps on Wireless-N).
    • Note the actual speed when connected to your N900 router, which may be lower than expected.
  2. Consider External Adapter Options:
    • Explore external USB adapters like the Netgear N600, which can provide better performance than built-in adapters.
    • Ensure the USB adapter supports higher speeds and has advanced features that your laptop’s built-in adapter may lack.
  3. Disable Built-In Adapter:
    • Use Device Manager to disable the built-in Wireless-G adapter to eliminate competition for network resources.
    • This step ensures that the external adapter can fully utilize the router’s capabilities without interference.
  4. Switch Channels for Better Performance:
    • Connect the USB adapter to the 5GHz band if possible, as this band typically offers less interference and higher speeds compared to 2.4GHz.
    • Check network traffic on both bands to choose the least congested one.
  5. Enable WPA2 Encryption:
    • Ensure your router is using WPA2 encryption for the best security and maximum speed.
    • This setting helps protect your network and ensures optimal performance.
  6. ** Monitor and Optimize Router Settings:**
    • Adjust router settings to prioritize certain devices or channels if needed.
    • Regularly check for updates and firmware to maintain peak performance.
  7. Test and Compare:
    • Test the connection speed both before and after enabling the external adapter and switching channels.
    • Note improvements in activities like streaming video or file transfers.

By following these steps, you can enhance your network’s speed and reliability, ensuring that your older computer runs smoothly on a modern network.

Speeding Up Your Wireless Network: A Simple Guide

Is your wireless network running slow? It can be frustrating, but there are easy ways to fix it. Let’s break it down.

Why Your Network Might Be Slowing Down

  1. Older Encryption Methods: Just like using an older, slower car model, outdated encryption like WEP or WPA can make your network go slower and be less secure.
  2. Channel Congestion: Imagine a busy highway with too many cars (other networks). If your router is using a channel that’s already crowded, your internet speed will suffer.
  3. Device Compatibility: Some older devices might not support newer standards like Wireless-N or Wireless-AC, making your network run at a slower pace.

How to Boost Your Network’s Speed

  1. Upgrade Your Encryption: Use WPA2 encryption for the best security and fastest speeds. It’s like adding the latest safety features to your digital car.
  2. Choose a Less Crowded Lane (Channel): Just like picking a lane with less traffic, check online tools to find a channel that’s less busy. This can help reduce interference and improve your connection.

Understanding Your Devices

  • Speed varies based on devices: A newer device might need the 5GHz band for faster speeds, while older ones stick to 2.4GHz.
  • Antennas matter: More antennas mean better performance. So, look for routers with multiple antennas if you want a faster connection.

Practical Steps You Can Take

  1. Check Your Router Settings: Make sure your router is using WPA2 encryption and that it’s set to use both 2.4GHz and 5GHz bands.
  2. Use Channel Analyzer Tools: Online tools can help you pick the best channel for your area, avoiding those with heavy traffic.

Summary

By understanding how your network works and making smart choices about channels and security, you can turn a slow, insecure connection into a fast, reliable one. It’s like optimizing your digital highway to avoid traffic jams and accidents.

With these tips, anyone can improve their wireless network’s performance and enjoy a smoother online experience.

WIFI Settings

To optimize your wireless network’s performance and speed, consider the following organized approach:

  1. Channel Selection:
    • Use channels 1, 6, or 11 for better signal quality and reduced interference.
    • Utilize tools like InSSIDer to identify less busy channels in your area.
  2. Encryption Settings:
    • Enable WPA3 encryption if supported by your devices for the strongest security and performance.
    • Avoid outdated standards like WEP and WPA unless necessary.
  3. Dual-Band Routers:
    • Use dual-band routers to connect older devices (2.4GHz) and newer gadgets (5GHz) separately, maximizing speed.
  4. Minimize Interference:
    • Reduce interference from devices like Bluetooth or competing Wi-Fi networks.
    • Ensure good signal quality by using external antennas if possible.
  5. Network Management:
    • Check your router’s current settings to ensure they are set optimally.
    • Consider manual channel selection if auto-settings aren’t sufficient.

By following these steps, you can enhance your wireless network’s performance and enjoy a smoother online experience.

Upgrade, Repair, or Replace?

When your tech breaks, you’re faced with a tough question: should I fix it, upgrade it, or just get a new one? Let’s break it down.

The 50% Rule

The 50% rule says if repairing costs more than half the price of a new device, it’s better to replace. Think about your phone—repairing might cost $200, but a new one could be $400. So, repair or replace? If repair is over 50%, choose replace.

When to Repair

  • If you love your device and it’s not broken too bad.
  • If fixing it yourself or by a pro doesn’t break the bank.
  • If it’s under two years old and worth the investment.

When to Upgrade

  • If you want better features like a bigger screen or faster speed.
  • If upgrading parts (like RAM or storage) makes sense but costs too much to fix.
  • If the device is getting old and might break more often.

Replace When

  • It’s over two years old and repair costs are high.
  • You can’t find good replacement parts.
  • You don’t want to deal with the hassle of fixing it yourself.

Choosing Third-Party Parts

  • Look for savings on things like chargers and batteries.
  • Check reviews carefully before buying.
  • Universal items might work across devices, saving money.

By following this guide, you can decide whether to fix your tech or get a new one, saving time and money in the long run!

Understanding Camcorders

Understanding Camcorders


Camcorders are like small video cameras that you can carry around. They don’t use old tape anymore; instead, they use built-in or added memory like a flash drive to store videos.

Control Buttons
Menu Button: Lets you change settings for what you’re shooting.
Playback Button: Lets you watch the videos you’ve taken on the screen.
Shutter Button: Starts and stops recording video.
Zoom Buttons: Let you look at your subject bigger or smaller.
Delete Button: Lets you get rid of videos you don’t want anymore.

External Features
LCD Screen: A small screen where you can see what you’re shooting and what you’ve already recorded.
Battery: Most camcorders use their own rechargeable batteries, like how a smartphone works. Some can also use regular AA batteries if you prefer.
Connections: Camcorders connect to TVs or computers using HDMI cables for better picture quality on HD TVs or USB cables to transfer videos to your computer.

Adding More Features
Some camcorders have special places where you can attach microphones to record better sound. You might see these called “hot shoes.”
You can also use lights or other gadgets to make your videos look better, depending on the camcorder you choose.

Keeping Your Camcorder Healthy
Don’t let it get dirty or scratchy. Clean the screen and lens gently.
Be careful not to drop it too much, as that can break the camera or the lens.
Don’t leave batteries in the camcorder for a long time, as they might leak or make the camera bad.

By treating your camcorder well and keeping it clean, you can take great videos and share them with your friends

Digital Cameras

Digital cameras are like tiny computers with built-in lenses that capture images and store them digitally. They come in various shapes and sizes, from compact point-and-shoot models to larger SLR (Single-Lens Reflex) cameras.

Control Buttons and Switches

  • Menu Button: Used to access settings for the current mode.
  • Playback Button: Lets you view photos or videos on the LCD screen or transfer files via USB.
  • Shutter Button: Takes photos or starts video recording.
  • Zoom Buttons: Let you zoom in or out to get a wider or closer view of your subject.
  • Delete Button: Allows you to delete unwanted photos or videos.
  • Shooting Mode Selector: Switches between photo and video modes.

External Features

  • LCD Display: Used for menus and viewing images. Some have swiveling screens for better angle shooting.
  • USB Port: Connects the camera to a computer for transferring files.
  • AV Port: For connecting external devices like speakers or monitors.
  • Microphone Port: Records audio when shooting video, with some supporting add-on microphones.

Interchangeable Components

  • Lenses: Can be swapped for different zoom levels or prime lenses.
  • Hot Shoe: Attaches to cameras designed for external flashes, enhancing lighting capabilities.
  • Microphones: Improve audio quality during video recording.

Internal Components

  • Image Sensor: Determines image quality and low-light performance. Larger sensors (like in full-frame SLRs) generally perform better.
  • Memory Cards: Most use Secure Digital (SD) cards for storage.
  • Mirror System: Reflects light through the lens to the viewfinder, a key part of the camera’s focusing system.

Points of Failure

  • Lens Cleaning: Keep lenses clean to avoid scratching and poor image quality.
  • Impact Damage: Can misalign lenses; repair needed.
  • Water Exposure: Prevent use in wet conditions unless the camera is waterproof.
  • Battery Storage: Avoid storing batteries in unused cameras to prevent leakage or corrosion.

By understanding these features, you can better care for your digital camera and ensure it works smoothly for years to come.

Understanding HDTVs, Projectors, and Monitors

HDTVs (High-Definition Televisions), projectors, and monitors are all devices that display visual content with high resolution. Each has its own unique features and how they function internally.

HDTV Basics:

  • Resolution: HDTVs display images at 720p or higher.
  • Display Technologies: They use Liquid Crystal Display (LCD) or Digital Light Processing (DLP) technologies.
  • Ports: They have HDMI, VGA, and sometimes Component, S-Video, or Composite ports for video input. Audio is often handled through HDMI or RCA ports.

Projector Features:

  • Resolution Support: Most support resolutions up to 1080p or even higher with 4K.
  • Port Options: Typically include HDMI, VGA, USB for both video and data inputs.
  • Control Functions: Allow users to adjust settings like focus, zoom, and keystoning.

Monitor Differences:

  • Types: Monitors use LCD technology and are designed for desk use.
  • Ports: Usually have HDMI or DVI for video input and RCA or HDMI for audio.

Common Components Across Devices:

  • Backlight Assembly: Often uses fluorescent technology and can be a point of failure.
  • Mounting Options: Most can be wall-mounted using VESA mounts.
  • Battery Issues: Projectors and some monitors aren’t designed for battery replacement, so service is needed if the battery dies.

Maintaining Your Devices:

  • Keep cables secure to prevent damage.
  • Turn off unnecessary features like Bluetooth when not in use.
  • Avoid exposing devices to extreme temperatures or moisture.

By understanding these basics, you can better maintain and troubleshoot your HDTV, projector, and monitor, ensuring they work smoothly for years to come. </think>

Understanding HDTVs, Projectors, and Monitors

HDTVs (High-Definition Televisions), projectors, and monitors are all devices that display visual content with high resolution. Each has its own unique features and how they function internally.

HDTV Basics:

  • Resolution: HDTVs display images at 720p or higher.
  • Display Technologies: They use Liquid Crystal Display (LCD) or Digital Light Processing (DLP) technologies.
  • Ports:
    • Video ports: HDMI, VGA, and sometimes Component, S-Video, or Composite.
    • Audio ports: Often through HDMI or RCA.

Projector Features:

  • Resolution Support: Most support resolutions up to 1080p or higher with 4K.
  • Port Options: Typically include HDMI, VGA, and USB for both video and data inputs.
  • Control Functions: Allow users to adjust settings like focus, zoom, and keystoning.

Monitor Differences:

  • Types: Monitors use LCD technology and are designed for desk use.
  • Ports:
    • Video ports: HDMI or DVI.
    • Audio ports: RCA or HDMI.

Common Components Across Devices:

  • Backlight Assembly: Often uses fluorescent technology and can be a point of failure.
  • Mounting Options: Most can be wall-mounted using VESA mounts.
  • Battery Issues: Projectors and some monitors aren’t designed for battery replacement, so service is needed if the battery dies.

Maintaining Your Devices:

  • Keep cables secure to prevent damage.
  • Turn off unnecessary features like Bluetooth when not in use.
  • Avoid exposing devices to extreme temperatures or moisture.

By understanding these basics, you can better maintain and troubleshoot your HDTV, projector, and monitor, ensuring they work smoothly for years to come.

iOS Devices

iOS Device


iOS devices, like iPhones and iPads, are similar in many ways but also have some key differences from Android devices. Let’s take a closer look.


External Features:
Ports: Most new iOS devices use a Lightning port for charging and data transfer.
Cameras: Both front and rear cameras are available, with the rear camera having higher megapixel counts.
Touchscreens: All have high-definition (HD) screens that you can rotate to view in landscape or portrait mode.

Internal Components:
Battery: iOS devices usually have built-in batteries that aren’t meant to be replaced by users. If your battery dies, you’ll need to get it fixed at an Apple store or through a service center.

Keeping Your Device Safe:

iOS devices are generally durable, but they can still break if dropped or mishandled. To protect them:

Use a case or sleeve when not in use to prevent scratches or cracks.
Be careful with charging cables and avoid bending or overheating them.

Charging and Maintenance:

Always use the correct charger and cable to avoid damage.
Turn off unnecessary features, like Bluetooth, when you’re not using them.
If near a Wi-Fi connection, leave it on; otherwise, turn it off to save battery life.

If your device’s battery dies and you can’t charge it immediately, it might stop working until you do. So, keep spares of charging cables and chargers at home for easy access when needed..