Troubleshooting Laptop Power Problems 
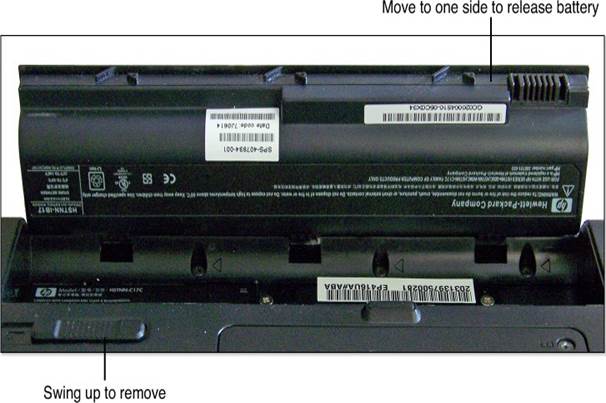
If your laptop isn’t turning on and you don’t have a multimeter, you can do a simple test on the AC adapter. First, unplug it from the wall and take out the laptop battery. Next, plug the AC adapter back in and try to turn on the laptop. If it powers on, the AC adapter is working fine. 
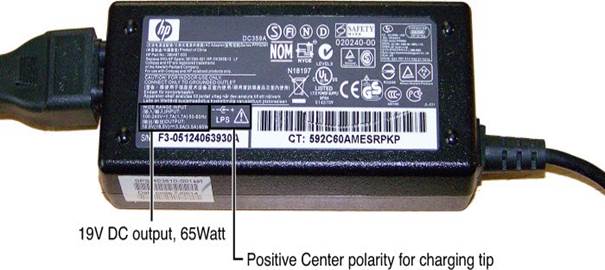
It’s also important to check the label on the AC adapter to find out its wattage, output voltage, and polarity. This information is useful if you need to test the adapter or buy a new one. For example, many laptop adapters output 19V DC, with the positive connection in the middle of the plug and the negative on the outside. If your laptop won’t run without the battery while it’s plugged in, check these things: Check the Outlet: Make sure the laptop is plugged into a working outlet. You can test this by plugging in a lamp or clock radio to see if it works. You can also use a portable outlet tester or a multimeter set to AC voltage to check if the outlet is providing power. Check the Power Cord: Ensure that the power cord from the outlet to the adapter is securely plugged in at both ends. If the cord or plug looks damaged, you should replace it. 
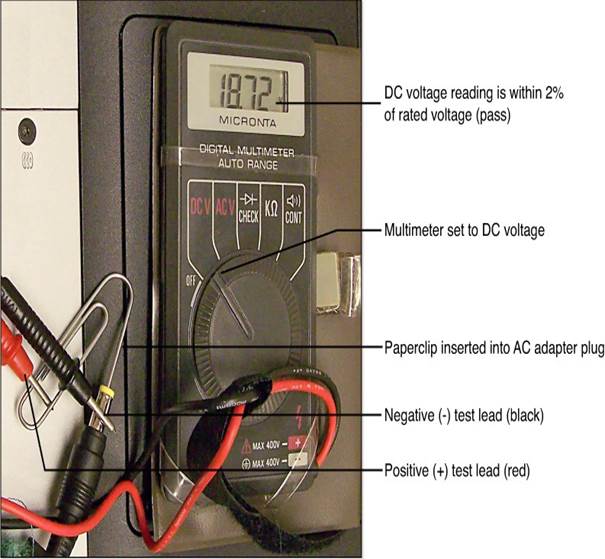
Test the Adapter Voltage: To see if the adapter is giving the right DC voltage, use a voltmeter or multimeter set to DC voltage. Compare the reading to the values on the adapter label. Sometimes, you might need to use a bent paper clip to get an accurate reading. A voltage that is within ±5% of the rated value is acceptable. By following these steps, you can figure out what might be wrong with your laptop’s power supply..
If your Windows device gets infected with malware, you might need to use more than one program to get rid of it. Sometimes, malware can mess up Windows settings, causing various problems.
One helpful tool is the Windows Repair tool from Tweaking.com. It makes it easy to fix issues caused by malware or other problems. Before you start fixing things, it will ask you to choose options like running Malware Bytes to check for malware, using Chkdsk to find disk errors, creating a system restore point, and running System File Checker to fix any wrong system files.
If you want to fix things yourself, you can find guides online that show you how to repair a malware-damaged PC.
What if your computer is so infected that it won’t even start in Safe Mode? Some antivirus companies, like AVG and Kaspersky, offer files you can download to create a bootable CD or USB drive. This drive can scan your computer for malware and help remove it.
You can get the AVG Rescue CD from their website, and Kaspersky Rescue Disk 10 is also available online.
After using these tools to remove serious infections, restart your computer and use a program like the Windows Repair tool to get everything back to normal.
Android devices are more likely to get malware compared to iOS devices. Many apps in the Google Play Store can have malware, even though Google has made improvements to find these harmful apps. Luckily, there are many good security and anti-malware apps available in the Google Play Store.
These apps usually have features like blocking dangerous websites, scanning your device for malware, boosting performance, and protecting against theft. For example, the AVG AntiVirus FREE app can find harmful apps, like the Wallpaper Dragonball app, and suggest that you uninstall it if it’s causing problems.
Another app, Clean Sweep, helps make your device run better by getting rid of junk files and unused programs. It also scans for malware. For instance, it can automatically find a test file that checks for viruses and suggest that you remove it.
Using these apps can help keep your Android device safe and running smoothly.
Even though Apple iOS devices are not easily affected by malware that targets Windows computers, it’s still important to keep your devices safe from common threats. Since iOS devices can share information with Windows and Mac computers, an unprotected iOS device could be used to launch attacks.
There are anti-malware apps for iOS that offer helpful features. For example, some apps can scan email attachments for viruses, protect you from websites that track your online activities or have malware, and help back up your contacts or find a lost device. You can find these apps in the iOS App Store.
Using these tools can help keep your iOS device secure and your information safe.
As mentioned earlier, modern web browsers have some tools to help fight against malware. However, you need extra protection for the following threats:
Real-time protection against malware that comes from the web, email, or USB drives.
Malware scanning to find and remove infections that slip past real-time protection.
Spyware scanning to detect and eliminate privacy threats, like tracking cookies and apps.
Start by using a good anti-malware program that offers real-time protection and regularly scans your computer for malware. For example, Windows 8 and 8.1 come with Windows Defender, which provides both real-time and scanning protection. If you want to use other anti-malware programs with Windows 8/8.1 or Windows RT, you can check the Windows Compatibility website for compatible options.
For older versions of Windows, you can find links to commercial products (some of which are free) on the Microsoft website.
To enhance your protection, consider installing an additional anti-malware scanner that works alongside your main protection. Malwarebytes is a popular choice that is free, quick to set up, and well-respected in the industry. It can help find problems even after other programs have scanned your system.
To tackle spyware, like tracking cookies or apps, you should also get an antispyware app that can work with your real-time protection. SUPERAntiSpyware is another good option that has a free version and is highly rated. It can help find and remove tracking cookies from your system.
Free vs. Paid Anti-Malware and Anti-Spyware Apps
There are many good free anti-malware and anti-spyware apps available, so you might wonder why you should pay for protection. Paid versions of these apps usually offer extra features, such as phone support, automatic updates, real-time protection, and scheduled scans. If you choose to use free apps, you’ll need to remember to keep them updated and scan your system regularly.
Are you getting lots of annoying pop-up ads? Has your web browser changed your home page without asking? Is your once-fast computer now really slow? Or can’t your browser connect to the Internet? These issues might be caused by malware.
Malware, short for malicious software, is a type of software that can slow down your computer, steal your information without you knowing, and make it hard for you to access your data and the Internet.
Here are some common types of malware:
Virus: A program that spreads to other files when you run it.
Trojan Horse: Malware that pretends to be helpful, like a video player or antivirus software, but is actually harmful.
Worm: A type of malware that can spread itself automatically through a network.
Fake Security Software: This pretends to find viruses on your computer and asks you to pay to remove them, even though there’s nothing wrong.
Ransomware: This malware locks your files and demands payment to unlock them, often with a deadline to pay.
Rootkit: Malware that hides itself in your operating system to avoid being detected.
Keylogger: This records everything you type, including passwords and sensitive information.
Spyware: Malware that collects your information and sends it to other websites.
Adware: This shows pop-up ads that can slow down your computer.
Browser Helper Objects (BHOs): These change how your browser works, like adding toolbars or changing your home page.
Some legitimate programs might do similar things, like asking if you want to install a toolbar. The difference is that malware makes changes without your permission. It operates in the background. To keep your computer running well and your information safe, it’s important to understand malware and how to deal with it.
How Malware Attacks
Through Your Browser:
If you use the Internet often, your web browser can be a way for malware to get onto your device. For example, you might see a website that claims to upgrade your video player or one that pretends to scan your computer for viruses. If you accept these offers, you could end up installing malware.
Through Email:
Emails that look like they’re from banks or other companies can also spread malware. They often try to get you to click on a link that leads to a harmful file or a fake website. This is called “phishing.”
Through Phone Calls:
Some scammers call you pretending to be from a tech company like Microsoft. They might say there are problems with your computer and guide you to install software that gives them access to your device. If you get such a call, just hang up.
Through USB Drives:
Malware can also spread through USB drives or flash memory. If your computer is set to automatically run files when you connect a USB device, any malware on it could infect your system right away.
How to Protect Yourself from Malware
To keep malware from causing problems, you need to take steps to protect yourself:
Be Careful with Emails and Online Scams: Don’t click on suspicious links or attachments.
Use Browser Protection: Enable features that warn you about unsafe websites.
Install Anti-Malware Software: Use programs that protect against malware.
Scan Regularly: Check your computer for malware often.
Fix Any Damage: If malware does get through, take steps to repair the damage.
Avoiding Scams
Scams are tricks designed to take your money or information. To avoid being scammed, think carefully about the links and information you see. Here are some tips:
Spot Fake Websites: Look for differences between real and fake sites.
Check Links Before Clicking: Hover over links to see where they lead.
Be Wary of Zip Files: These can hide malware, so don’t open them unless you’re sure they’re safe.
Log In Directly: Instead of clicking links in emails, type the website address into your browser.
Signs of Fake Websites
Fake websites often look like real ones, using similar colors and designs. If a login page doesn’t have security features, it might be fake. Always check the URL before entering any information.
Use Your Browser’s Protection
Modern browsers have built-in features to help protect you from malware. For example, Internet Explorer has SmartScreen technology that warns you about phishing attempts and blocks harmful downloads. Firefox and Google Chrome also have protections against malware.
Don’t Rely on Just Your Browser
While having a browser that fights malware is helpful, it’s not enough on its own. You should also use anti-malware software for extra protection. Make sure you have multiple layers of security to keep your devices safe from malware.
To make the most of the tips in this section, you may need to change some settings on your wireless router. Here’s how to get started:
Even if you usually connect to your router wirelessly, plug an Ethernet cable into one of the router’s ports and connect it to your computer. Most routers need a wired connection to change settings, even if some can be managed wirelessly.
Open your web browser and type in your router’s IP address. If you don’t know what it is, check the instructions that came with your router. You can usually find a PDF or webpage from the router company.
When prompted, enter the username and password. The default information is in your router’s instructions. If you’ve changed these, make sure to write them down somewhere.
To find your computer’s IP information, you can use the command prompt and type IPConfig/all. Look for the Default Gateway listed for your Ethernet connection; this is your router’s IP address.
To change wireless settings like the network name (SSID), security options, password, and channel, go to the Wireless Setup section.
If you need to set up a device using WPS, go to the Wi-Fi Protected Setup section.
You can also check the Device and Client table to see the names and MAC addresses of devices connected to your network.
If some gaming systems are having trouble connecting to the Internet, you might need to set up port forwarding or allow direct Internet access for a specific device (known as DMZ). Look for these options in the advanced settings of your router.
After making your changes, remember to save them (some routers have a Save button at the bottom of the page) and close your browser. If you don’t usually use a wired connection, you can unplug the Ethernet cable from your computer but keep it connected to the router for future use.
Firmware Updates
Firmware is the software that controls how your router and mobile devices work. Updates to firmware can fix problems or add new features.
To update a smartphone or tablet, contact your service provider or the device maker.
For more details on updating, check the relevant section in your guide.
Updating Your Router
You can get firmware updates for your router from two places:
The router manufacturer
A third-party firmware provider, like DD-WRT
Getting Updates from the Manufacturer:
Find the model and version number of your router, usually found on a label on the bottom or side. Different models may need different updates, so it’s important to know exactly which one you have.
Log in to your router to check the current firmware version. This info is often on the login page or in the settings; refer to your router’s instructions for help.
Visit the manufacturer’s website and go to the Support or Downloads section. Look for your router model to see available firmware updates and what issues they fix.
If a new firmware version can solve your router problems, download it. The latest version usually includes all previous fixes.
Before installing the new firmware, write down your current router settings. You can take screenshots or use a camera. This is important if you’ve changed the default login info or set up special features, as some settings might be lost during the update.
Follow the instructions in your router’s documentation or on the website to install the firmware. You’ll likely need to log in with a wired connection. If your router has a USB port, you may need to copy the firmware update file to a USB drive.
After the update, restart your router.
Reapply any custom settings that may have changed during the update using the notes you made earlier.
Caution:
If the new firmware causes problems, you might want to try an earlier version. It’s best to update firmware only when it fixes a specific issue on your network, not just because a new version is available.
If you can’t connect your mobile device to Wi-Fi or a cellular network, it might be in Airplane mode. Airplane mode turns off all wireless signals on your device, including Wi-Fi, Bluetooth, and cellular connections. This feature was created so people could use their devices during flights, but it has other benefits too:
Longer battery life
Increased privacy
When Airplane mode is on, you’ll see a small airplane icon on your device’s screen.
To turn on Airplane mode, go to the Settings menu on your device. On Windows 8/8.1, you can find it in the Networks menu.
By default, Airplane mode disables all communication, but you can still turn on Wi-Fi or Bluetooth if you want. This is useful if you’re traveling outside your cellular network area or in another country, as it can help you save money.
Switching Connection Types Manually
When using a mobile device that has both Wi-Fi and cellular data, remember that you can only use one at a time. Usually, Wi-Fi is on all the time and connects automatically when you return to a familiar hotspot, like your home or school.
However, if you find yourself connected to a weak Wi-Fi signal that doesn’t work well, but you have a strong cellular signal, you can switch to cellular data by following these steps:
Go to your device’s Settings and turn off Wi-Fi.
Your device should automatically connect to the cellular network.
When you’re back in an area with a strong Wi-Fi signal, turn Wi-Fi back on.
Mobile Hotspots and Connection Security
You might see signs for “Free Wi-Fi” in places like hotels, restaurants, and coffee shops, but be careful using these networks. They are often not secure, which means your personal information, like emails and bank details, could be at risk. Free Wi-Fi is fine for casual browsing, but it’s not safe for important tasks like online banking.
If you have a secure remote connection service on your home or office computer, like Go To My PC, you can use that to check emails or shop online safely by accessing your remote computer.
Using Your Device as a Hotspot
If you have a smartphone, tablet, or laptop that can share its cellular data, you can create a secure connection for other devices. You can share your connection with one device using USB tethering or with multiple devices using the Wi-Fi hotspot feature.
Using USB Tethering
To use USB tethering, follow these steps:
Connect a USB cable from your computer to your device.
Turn on the USB tethering option on your device.
If you’re using a Windows computer, select the network type (Home) when prompted.
Use your computer’s web browser and other network features as usual.
When you’re done, turn off USB tethering.
In the Device Manager, you’ll see the tethered connection listed as a Remote NDIS based Internet Sharing Device.
Using a Wi-Fi Hotspot
To use the mobile hotspot feature, do the following:
Turn on the mobile hotspot feature.
Choose how you want to share your connection wirelessly.
If you want to allow only certain devices to connect, you’ll need to provide a name and MAC address for each device. The MAC address can usually be found on a label or by using the command prompt on your computer.
Open the Allowed devices menu, add the MAC address, and save it.
Each device will need the SSID (network name) and password to connect to your hotspot.
Connect just like you would to any other Wi-Fi network by entering the password when asked.
When you’re finished using the internet, remember to turn off the hotspot feature.
Caution
Some mobile providers may charge extra fees for using your device as a hotspot. Check with your service provider for details. Also, keep in mind that all data used by devices connected to your hotspot counts toward your data limit, so be careful to avoid extra charges.
Powerline adapters, also known as HomePlug, are a great way to extend your internet connection using your home’s electrical wiring. While they might not be as popular as Ethernet or Wi-Fi, they can be very helpful when you can’t easily extend a wireless signal to other areas of your home or office.
A HomePlug network consists of two main parts:
One adapter plugs into a wall outlet and connects to your router or switch using an Ethernet cable.
The second adapter plugs into another wall outlet, allowing you to connect your device with another Ethernet cable.
Some kits come with a second adapter that also has Wi-Fi capability. This means you can connect your device either with a wired Ethernet cable or wirelessly through Wi-Fi.
The older HomePlug standard offered speeds of 85Mbps, but it has been updated to faster versions like HomePlug AV (200Mbps) and HomePlug AV2 (500Mbps). You can tell which version you have by looking at the speed rating of the adapter.
If you want to connect more devices, you can buy an additional compatible adapter. If the devices are close to the second adapter, you can connect it to a Fast or Gigabit Ethernet switch to share the internet connection with multiple devices.
To set up the connection between the two adapters, simply plug them in and press a button on each one to pair them together. You can use more than two adapters in most HomePlug networks.
Powerline adapters are especially useful in homes with thick walls or concrete construction because they can work well even when there are solid barriers blocking the signal.
Even though wireless networking gets a lot of attention, wired networking, also known as Ethernet, is still very useful. Here are some reasons why:
Security: Ethernet can’t be accessed by neighbors or strangers like Wi-Fi can.
Simplicity: Setting up Ethernet is easy—just plug it in!
Speed: Gigabit Ethernet is faster than most wireless networks, except for Wireless-AC.
If you already have Ethernet cables installed or can hide short cables behind furniture, using wired networking can be a better choice, especially if you have thick walls that slow down Wi-Fi.
Gigabit Ethernet (1000Mbps) is the fastest type of wired Ethernet for home use. It’s quicker than most wireless connections, making it great for sharing files, streaming videos, and printing over the network. Here’s how to check if you’re using Gigabit Ethernet:
Go to a Windows computer that is connected to the network with an Ethernet cable.
Open the Network and Sharing Center from the Control Panel or the Network menu.
Double-click on the Local Area Connection shortcut.
Look for the connection speed in the status box that appears.
Close the status window and any other open dialogs.
If your network is running at Fast Ethernet (100Mbps), you can check three things to see if you can upgrade to Gigabit Ethernet:
Cabling: Gigabit Ethernet needs CAT5e or CAT6 cables. Fast Ethernet can use CAT5 cables but can also work with faster ones.
Computer Ports: Most newer computers with Ethernet ports support Gigabit Ethernet.
Router or Switch Ports: Many low-cost routers and switches only have 10/100 (Fast Ethernet) ports, while newer models usually have 10/100/1000 ports that support both Fast and Gigabit Ethernet.
Checking Your Network Cable
To find out what type of Ethernet cable you have, look at the cables themselves. If your cables are built into the wall, you might see the markings by checking the RJ-45 wall jack. You can also hire someone to test your network for Gigabit Ethernet compatibility. If your cables were installed during construction, ask your builder what type was used.
If all the cables connecting your router and computers are CAT5e or CAT6, your network can run at Gigabit speeds. If you find CAT5 cables, don’t replace them until you check if your computers have Gigabit Ethernet ports.
Checking Your Computers for Gigabit Ports
To see if your computer’s network port supports Gigabit Ethernet, follow these steps:
Open Windows Explorer (Windows 7) or File Explorer (Windows 8/8.1).
Right-click on Computer (Windows 7) or This PC (Windows 8/8.1) and select Properties.
Open Device Manager.
Expand the Network Adapters section.
Look for an entry that says Gigabit Ethernet, GBE, or something similar.
If you can’t find the information in Device Manager, search online for the name of your network adapter to see what speed it supports.
Checking Your Router or Switch
To find out if your router or switch supports Gigabit Ethernet, you can:
Access the router or switch, find its name and version number, and look up its specifications online. Many newer routers that support the fastest wireless standard (802.11ac) also support Gigabit Ethernet.
If you can’t access the router or switch, compare the speeds supported to the network connection status. If the cables used are CAT5e or CAT6 and the network adapter supports Gigabit Ethernet, but the router only supports Fast Ethernet, you won’t get Gigabit speeds.
Other things that can slow down your network include poor-quality keystone jacks (the wall plugs for Ethernet), female/female Ethernet adapters (used to connect two cables), or using Ethernet hubs.
If your network has Ethernet hubs, replace them with Ethernet switches. Hubs split the total connection speed among all connected devices. For example, if you have a Fast Ethernet hub with four devices connected, each device only gets 25Mbps.